Layers and Masks
From my experience of using Adobe Photoshop, Layers and Masks used properly will give you a lot of processing power. A ‘Layer’ and a ‘Mask’ are two very different things. A ‘Layer’ is a duplicate of a photo placed on top of the original photograph… exactly. The ‘Mask’ is an area exactly the same size as your layer which you can paint with black, white or grey. Black will totally reveal the photo underneath. White will hide the bottom layer completely and Grey will mix the two layers. The purpose of doing this is that you can have different adjustments, such as: Levels, Saturation, Colour Balance or Contrast in each layer. And you can have many Layers.
For Example: You have a Landscape photo that is a bit soft and there is a lot of noise in places. You can duplicate the photo so you have 2 layers. You apply a sharpener to the original layer. The add a noise reduction to the top layer. With a Mask, you will be able to have parts of your photograph sharp. By painting the details with a black paint-brush, they will become sharper. Whereas the rest of the photo will be noise free.
For this guide you need to have Photoshop or similar Editing Software open with an image and be able to see the ‘Layers’ palette.
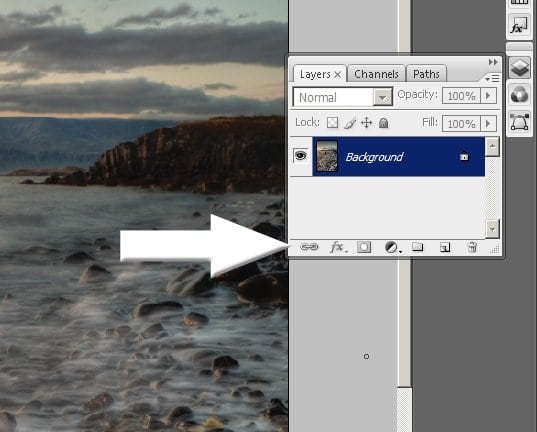
The Layers Palette
If you can’t find the layers palette, go to the ‘windows’ tab and select layers.
Now you can see it, so let me explain the different parts of the window… we will look at each aspect in greater detail later.
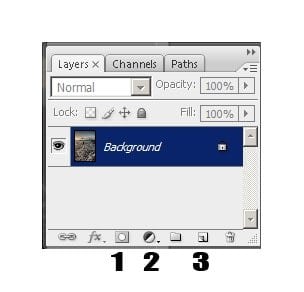
- Mask – this button creates a mask for the selected layer, it won’t work with just one layer
- Adjustment layer – this button will create another layer for the sole purpose of adjusting levels, curves etc.
- New layer – this button will create a new (blank) layer or you can drag one of your layers onto it to duplicate it
Duplicate Layer
There is only one layer here called ‘background’. It is locked and you cannot create a mask, but you can duplicate it. Try duplicating your layer by dragging the thumb image onto button 3 (New layer button).
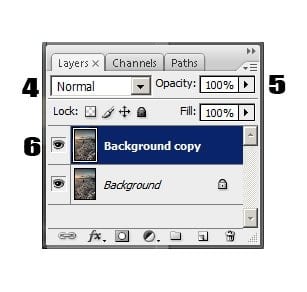
Toggle the Palette
4. Normal – this is the way we want the layer to mix or interact with the layer below it.
5. Opacity – this is the strength of the top layer
6. Eyeball – this is a way of turning the top layer on or off.
Try these tools on your palette, what do you notice?
You should notice that there is not much effect when you toggle the buttons… why?
Because both your layers are exactly the same.
Where it says ‘Normal’ try running through the different blending settings. This can be done with your mouse wheel. Try to study each setting and work out why it is having a different effect. Why is ‘Multiply’ so called? Why is ‘Screen’ so called? Notice that you can adjust the strength of the top layer with two sliders: ‘opacity’ and ‘fill’.
Adjustment Layers
Adjustment layers allow you to make adjustments to your images in a stack of layers. When you create an adjustment layer a mask is automatically generated. Using adjustment layers has two benefits to the way you might normally adjust a picture;
- You can go back and change any part of you adjustment, i.e. the curves or levels
- You can use masks to affect only certain parts of the photo.
Let us start with an image and create an adjustment layer.
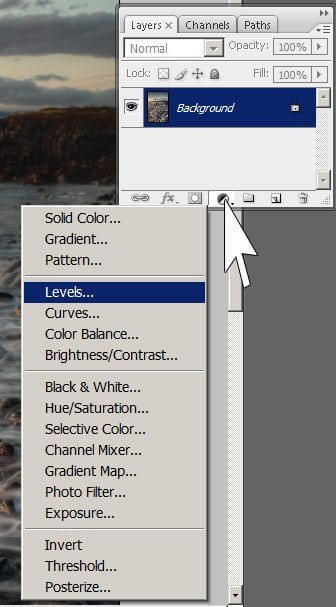
This will create a new layer with the sole purpose of adjusting the light levels of the image. See Basic adjustments – levels and curves for more details of how to make your adjustments.
Your new layer will be called ‘Levels’.
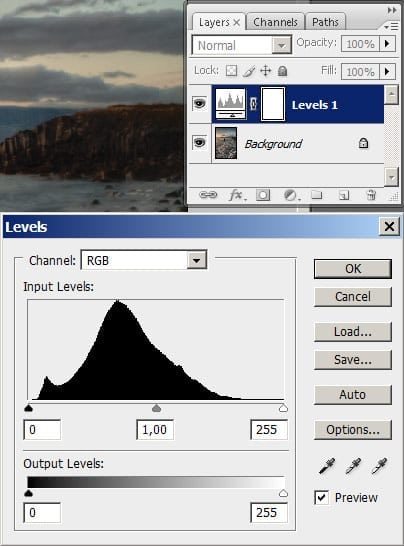
New adjustment layer
Now you can make your adjustments and click OK.
Make another adjustment layer, but this time choose ‘Curves’ from the drop-down box.
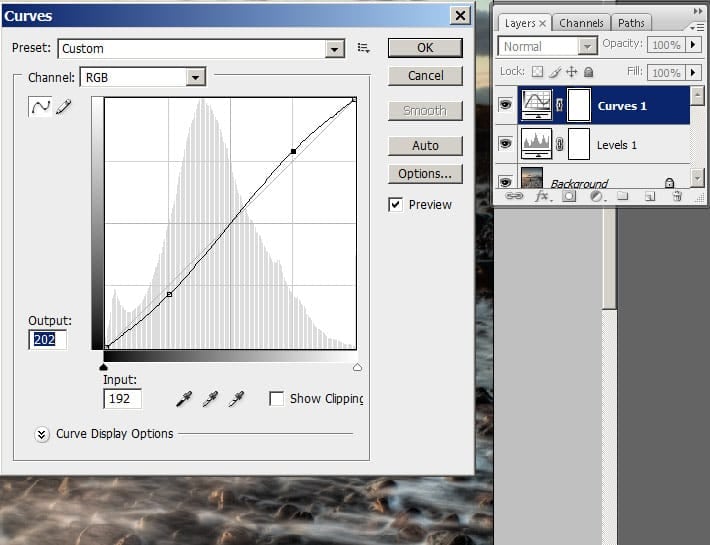
Make your curve adjustments and click OK. The new layer is automatically called ‘curves’. Notice that each adjustment layer is created with a mask.
Layer Masks
What exactly is a layer mask?
Imagine you have a Blue Mercedes with chrome bumpers, but you want to spray the car with a layer of Green Paint. An experienced person will carefully cover the windows, bumper, lights and door handles with masking tape.
Photoshop layer masks work in the same way, they allow us to make changes that affect only a certain part of an image. Masks are only black and white (and grey), basically speaking, if the mask is black, you can see the layer underneath, if it is white you can’t.
With your image open in photoshop, I want you to make very gentle levels adjustments, but make extreme curves adjustments… give you curves layer a BIG ‘S’ shape.
Paintbrush Tool
Now select the mask (click on it) and choose the paintbrush tool, you should see black and white on the paintbrush tool palette (bottom arrow). If it isn’t black and white, just click the icon just above it. To the right of that little icon is the foreground-background switcher.
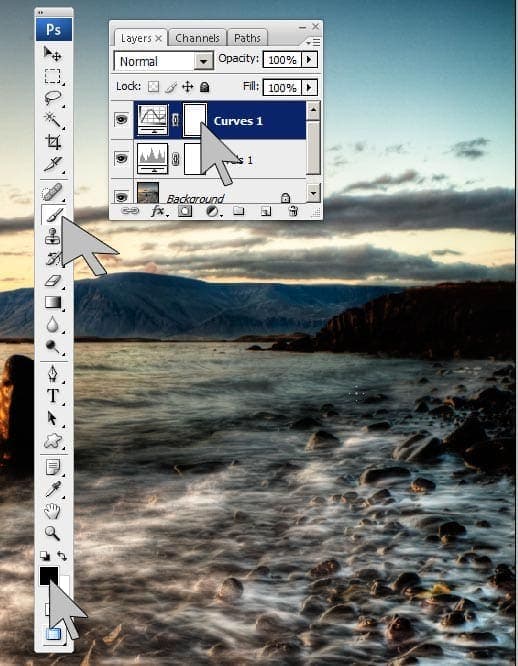
You can adjust the size, opacity and softness of the paint brush tool at the top of the photoshop window. Adjust it so that you can easily see it on your image.
Now start painting on your image, maybe just randomly, maybe you want to paint the sky or an object, I am going to paint the sea in my image because I don’t want it to be affected by the Curves Adjustment.
You should see two things start to happen:
- Your image will start to change
- Your layer mask will have some black on it
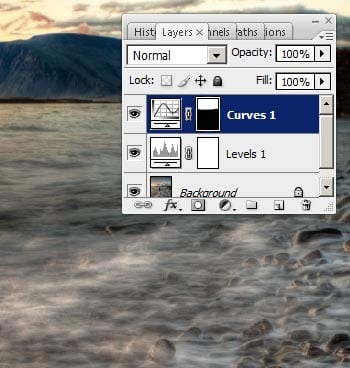
HINT: if you only want a small part of the image affected by the adjustment layer, you can invert the mask (Ctrl+i) so it becomes black and then use a white paintbrush to paint where you want the effect to appear.
Toggle the layer on & off
Now, you can click on the eyeball to take the curves adjustment layer away. Bring it back and click on the layer mask. Now press ‘alt’ and ‘i’, this will invert the mask. How does this change your picture? Why?
Remember that the mask will let you adjust certain parts of your image without affecting the rest. The black will let you see the layer beneath and the white will mask it. The lovely thing about masks is that if you make a mistake with the paintbrush, you can just change the colour to white and paint over it again.
Selection Mask
If you create a selection, such as selecting the sky with the magic selection tool or using a big rectangle, then click the Mask Icon, the selection will become the mask. If you can master a few selection techniques, then you can create some very useful masks and have even more control over your photo editing.
Moving Forward
Using Adjustment Layers is a great introduction to the power of Layers and Masks. If you want to get more out of your photo editing then you can use the same principle for duplicate layers. Duplicate your photo, add some noise reduction or sharpening effects. Then create a mask and have total control over where the effect takes place.
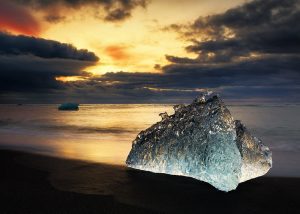
Check out my advanced technique using masks, channel selection and blending modes… Ice Beach Method.
